
Table of Contents
SECTION 1: GETTING STARTED.
Objectives
Logging In
Home Page
User Administration (for HR only)
Create a new user
Change the new user’s status
See a user’s profile
Proxy in as another user
SECTION 2: POSITION MANAGEMENT
Classifications
Position Descriptions
View/Edit existing Position Description (for HR Only)
Modify a Position Description
Create a New Position Description
Moving Position Description Requests in the Workflow
SECTION 3: APPLICANT TRACKING SYSTEM
Postings
View/Edit existing Postings
Create a New Posting
Posting Process
SECTION 4: REVIEW APPLICANTS
Applicant Review by Posting
Applicant Review by Applicant Search
Application Search
SECTION 5: HIRING PROPOSAL
Creating a Hiring Proposal
Search and Manage Hiring Proposals
SECTION 1: GETTING STARTED
Objectives
This document will guide you through the business processes in the system. It will lay the foundation for you to be able to understand how PeopleAdmin functions and to help you understand how business processes are achieved. At the end of this guide, you will be able to accomplish the following things:
- Create and approve a new
- Create and approve a request for a new Position
- Search for and modify a Position
- Create and post a new
- Apply to a
- Review
- Create and approve a Hiring Proposal to hire an
Logging In
Open your browser and go to the People Admin Log-In page (opens on the web) to log in.
Select ‘VCCS Employees click here to log-in.’
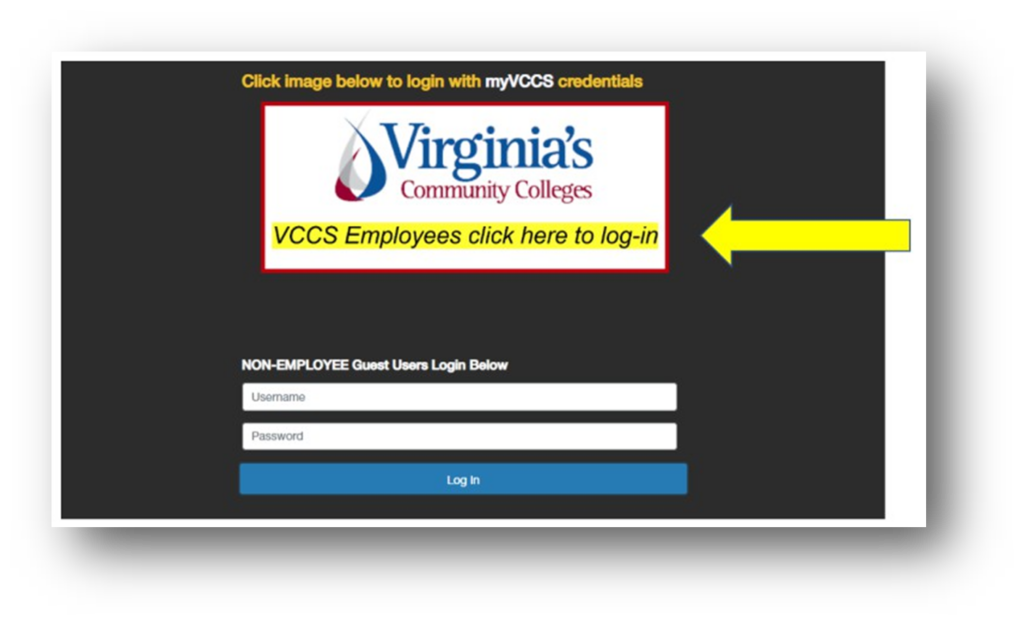
Things to know about logging in:
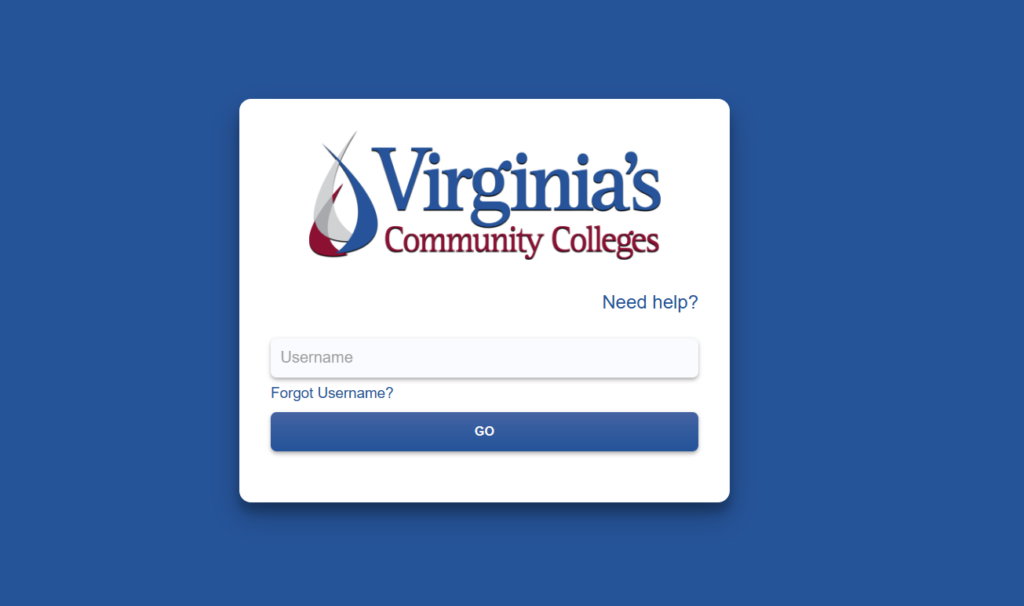
VCCS Employees: You will always log in using the link for your MyVCCS credentials. This will take you to the correct log in screen.
Non-Employee Guest Users: Log in using the Guest User login information provided to them. Use the white username and password box.
Another way to log in is through the MyVCCS at https://my.vccs.edu or college portal. Log in with your single sign-on and select the PeopleAdmin tile to access the Applicant Tracking System. The PeopleAdmin login page will open in a new browser tab and you will proceed as above by clicking the highlighted link where it says "VCCS Employees click here to log in".
Home Page
When you log in, you will see the home page. The menu and other options available to you will correspond to your user permissions.
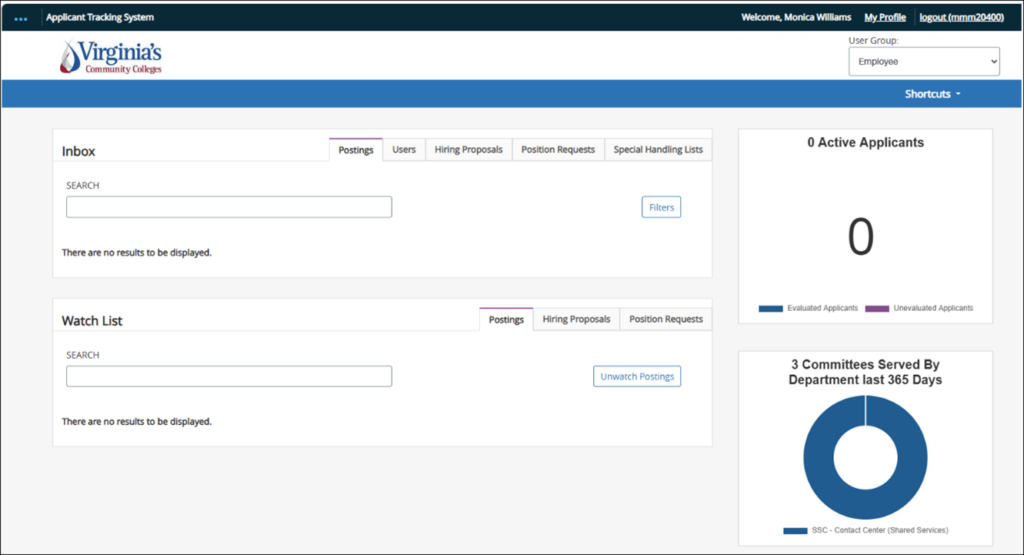
Things to know about the Home page:
- User Group Selection (below the logout link in the upper right corner of the screen):
- This menu is only available if you are assigned more than one permission group. It allows you to change the permission group you are using at the moment.
- Inbox (in the middle of the page):
- This notification area displays any items that you need to take action on. If you note a number on one of the inbox tabs, this indicates you have an assignment and requires your attention.
- Watch List (below the Inbox):
- This notification area displays any items that you have flagged for watching – for example, if you have access to multiple postings as Search Committee Member or College HR you may have an interest in following these job postings even when you are not required to take action.
- Modules/ Home Page (At the top left section of the screen):
- The module drop-down shows which part of the system you are in right now. When you first log in, you are in the Applicant Tracking System module as an Employee. If you click the three dots you will see the modules available to you. The modules available depend on your permissions and the way your system is configured.
- The Home page appears in all modules, with a different color bar at the top for each module. The Blue bar is the Applicant Tracking System, and the Orange bar is Position Management. You’ll return to the Home page when you change to a different module. The Grey bar is for Admin.
- My Links (lower right of the screen):
- List of useful links including direct links to training materials and the applicant portal
User Administration (for HR only)
Click the module selection drop-down menu and select ADMIN to open the administration module. This is where you can manage users and user permissions, adjust settings, work with reports, and automated system emails, and handle other system management tasks. The options that are available will depend on your user group permissions.
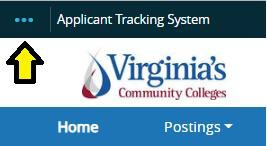

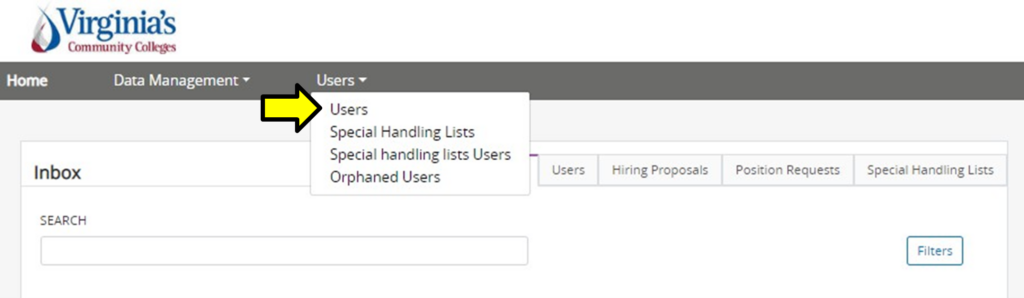
Select the Users tab and select the Users option from the menu. This takes you to the Users page where you can create new users or manage existing users.
Create a new user
Note: Generally, you will not need to create a new user in the system because the integration with HCM will manage this process. In the rare event that a user must be created manually, the following steps outline this process.
- Hover your mouse over the orange Actions button (top right corner of the page) and click Create New User.
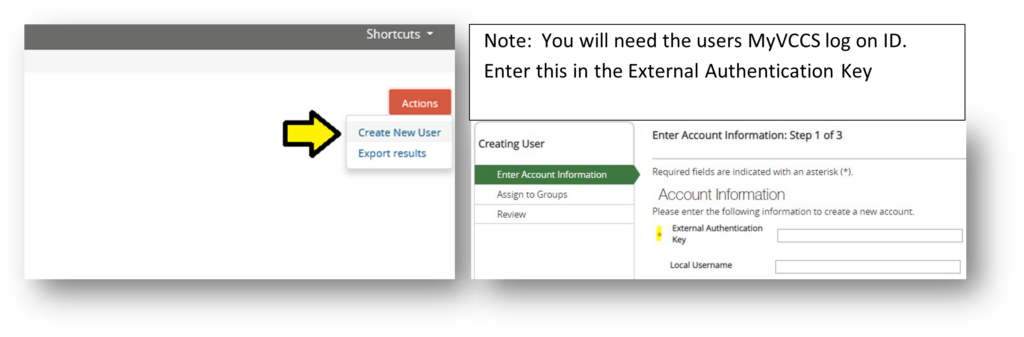
- Enter the user’s account. The system will help you complete the new user information by walking you through the tabs.
- Assign the user to permission groups and specific departments/divisions/locations within the organization. For now, assign this user to the Employee permission group and choose an organizational unit.
- When you reach the summary screen, you can open the manage emails tab to update the automated system emails that the user You will also be able to update and add groups using the groups tab.
Change the new user’s status
Hover over the orange Take Action on User button (top right corner of the page) and click Update Status.
Things to know about user status:
- Pending: Default status when user is created
- Approved: User is an active employee
- Deactivated: Anyone not currently employed by VCCS
See a user’s profile
Search and click the name of any user to open their user profile.
Proxy in as another user
Sometimes you need to see what the user sees in order to help them solve a problem. HR has the ability to login as any user.
- To do this from the Users list, hover over the Actions link (right side of the row) for that user and select Login as this User.
- To do this from the user’s profile, hover over the Take Action on User button (top right corner of the page)and choose Login as this User.
This allows you to see items as that user sees them. If you take any action while logged in as that user, the system will correctly log that you were the person who took that action.
SECTION 2: POSITION MANAGEMENT
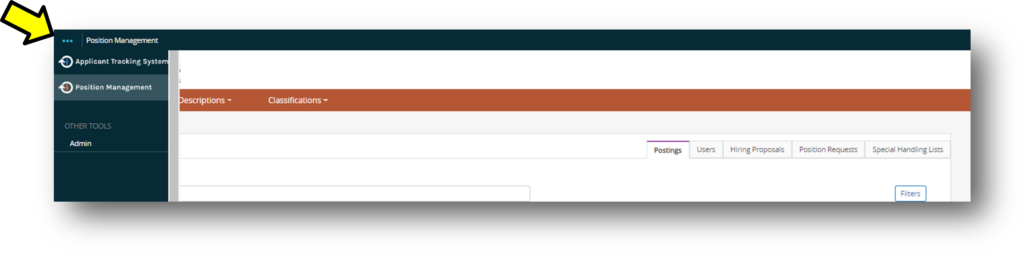
Click the module selection drop-down menu (three dots in upper left corner) and select Position Management to open the PM module. In Section 2 Position Management, we will walk through using the Classifications and Position Descriptions functions. We will start with how to use the Classifications function, but will focus most of our attention on how to use Position Descriptions to create and maintain positions.
Classifications
Classifications is an area of the system that allows you to view information on a higher level about the role codes available to use for a position description. Information displayed here will connect to a position description. Updates to classifications will not be required, as the items will feed over from HCM.
Position Descriptions
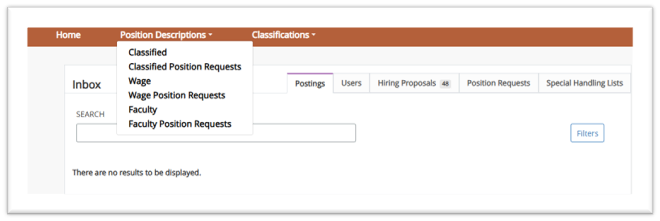
In this area, only HR can directly edit a position description. Here, positions are created or modified by performing position requests. These position requests are viewed under the position description drop down in the main menu.
Select the Position Descriptions tab. This will show you the Position Description list where you can select the position description to work on.
View/Edit existing Position Description (for HR Only)
After selecting the position type, hover over the Actions link to the right of the existing PD and click View.

From the summary screen, you can click any of the ‘edit’ links, indicated by a pencil, to edit the position description. This method should only be used by College HR for minor changes to a Position Description. For changes that require approval, see “Modify Position Description” instructions.

Be sure to click “Save” after making any changes.
The status of the position description can be changed from active to inactive or vice-versa by hovering over the orange Take Action on Position Description button (upper right corner) and choosing the status (Note: this is only available if you are logged in as College HR). Generally, you will not need to change the status of the position since this is managed through the integration with HCM.
Modify a Position Description
You will use this method for position modifications that require approval.
Click on the Position Descriptions drop-down to select the type of the position you wish to modify.

Use the search bar to find the specific position you will be modifying. Click on Actions (on the row to the right) to view the position, then click on Modify Position Description in the upper right part of the page.
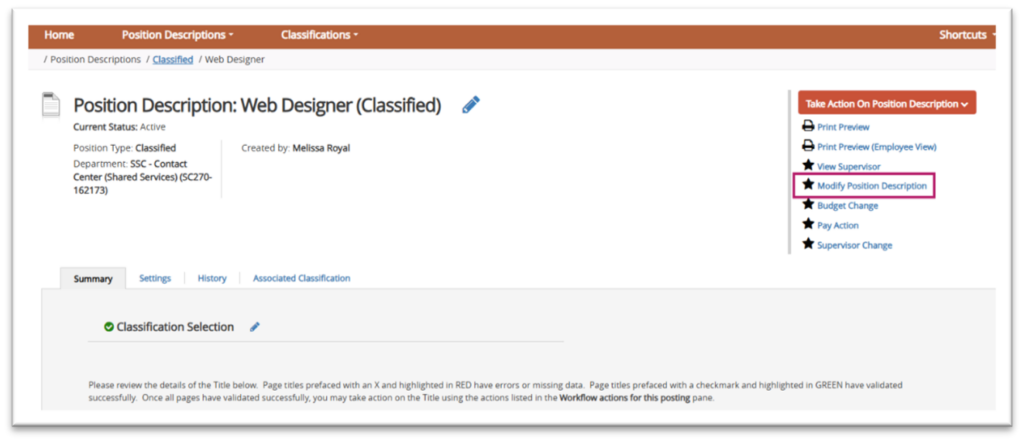
Click Start on the next page. Once it has been started, this position request will lock the position description from other updates until the position request has been completed. If the position request is not completed initially and you need to continue working on it at a later time, be sure to click the “View Outstanding Position Request” link. In the event you do not wish to move forward with edited changes, click the orange Take Action of Position Description button and select “Cancel”. This will unlock the position for future editing.
Make any necessary updates to the Position Description by clicking on each of the links to the left and ensuring that a green check mark appears next to each section. Click “Save” to ensure all modifications are included in the update.

To move the position request along in the workflow, hover over the orange Take Action on Position Request button (upper right corner) and choose the action that you would like to take.
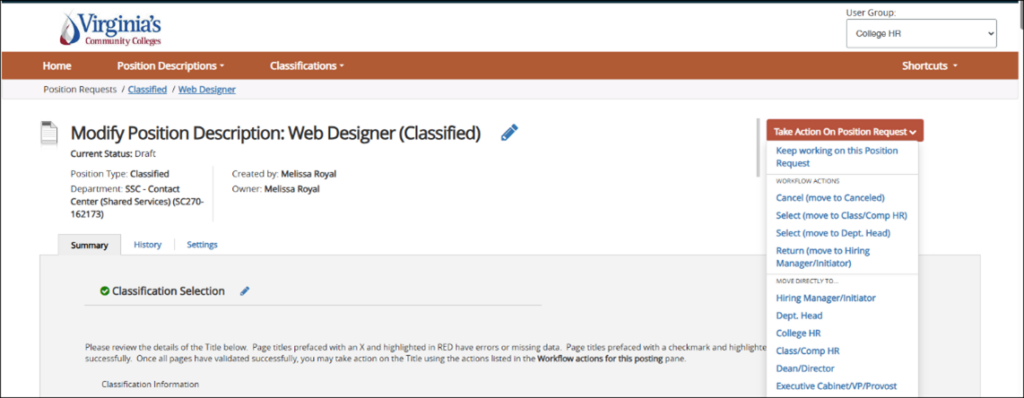
- Keep working on this Position Request: will keep position request saved where you leave off and allows you to pick it back up again.
- Workflow Actions: provides the next step in the VCCS workflow state
- Move Directly to: provides additional steps to either go forward or send back to a previous workflow state. (Only College HR and SSC HR have this option.)
When you transition the action, you will have the opportunity to choose a specific individual in the workflow and to add a comment. The comment will appear in the email sent to that specific individual and in the history of the position. If you cannot locate the appropriate individual, please contact College HR or SSC HR who can update the individual’s user group so they appear in the drop-down list, or you can simply choose your College HR who will route as needed.

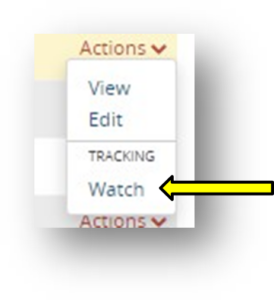
While the position request is in progress, it can be located by hovering over or clicking the Position Description menu item and selecting the position type Position Requests. An additional method of tracking your positions requests that are in progress, is to add to your Watch List by hovering over Action and selecting “Watch”.
Create a New Position Description
Begin from the Position Management module:
In the upper left corner, click the three blue dots to select POSITION MANAGEMENT module.
In this area, you will be able to view Classifications (Role Codes/Titles) and Position Descriptions. All active positions for your college are available here.
From the search screen, click the orange Create New Position Description button in the upper right. You’ll be able to start a new position request. Only create a new position if you are unable to locate an open (un-seated) position and role code that cannot be modified.
Initial Page:
Enter a position title and then select the location, division and department. You may also choose to clone an existing position in the system. Click Start Position Request.

Classification:
Search for and choose the classification (role title/role code) to which this position should be associated. The filter option is used to quickly identify the appropriate code. Click Save & Continue. As the request goes through the workflow, users will be able to see the classification selected. They will also have the opportunity to change the selected classification if needed.
Position Justification:
Fill in the information on the form including reason for new position and select “New Position” under EWP Modification. Click Save & Continue.

Position Details:
Fill in the information on the form and click Save & Continue. Note: Information from the EWP can be copied and pasted into the Job Description, KSA’s/Required Qualifications, KSA’s and Additional Considerations sections.
An * means this is a required field. Green checkmarks show the step is completed.

Physical Demands/Cognitive Requirements:
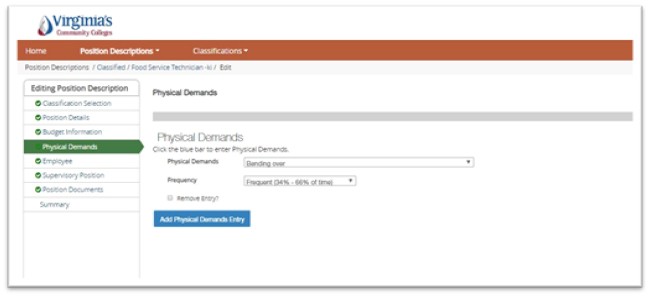
Use the blue button labeled "Add Physical Demands Entry" to add Physical Demands/Cognitive Requirements associated with the position and click Save & Continue. Note: You will need to click the blue button for each new entry.
Budget Information:
Click the blue “Add Budget Information Entry” button to add Budget information associated with the position and click Next.

Note: The information here should match HCM (e.g. Department number should be the same in both locations).
Supervisory Position:
Here you can search for and choose the position that supervises the position you are creating. This will build a hierarchy in the system. If you need to search for your position, you can click on Filter these Results to perform your search. Select the supervisor’s position and click Save & Continue.
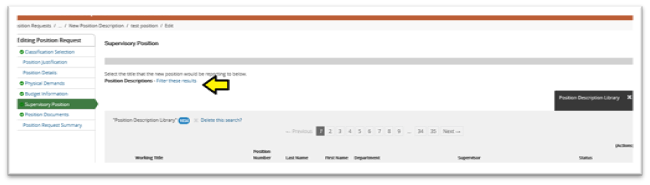
When searching for the position supervisor, the position type needs to be the position type of the supervisor not the position that is being modified.
Position Documents:
Add documents needed for each position and click Next. If documents are already uploaded to a position the modifier should verify that those documents are up to date.
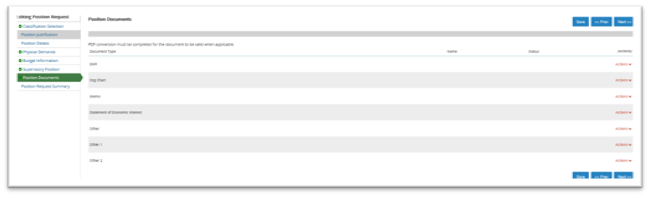
Review the position description information.
Click on Take Action on Position Request (in the upper right corner) to move the position request in the workflow to ensure that all approvers that need to see the position for approval before approving and adding this new position into the position library. Any sections marked with an orange exclamation mark will require completion before the Position Request can be moved in the workflow. Include a statement regarding the approval in the comments box that appears.
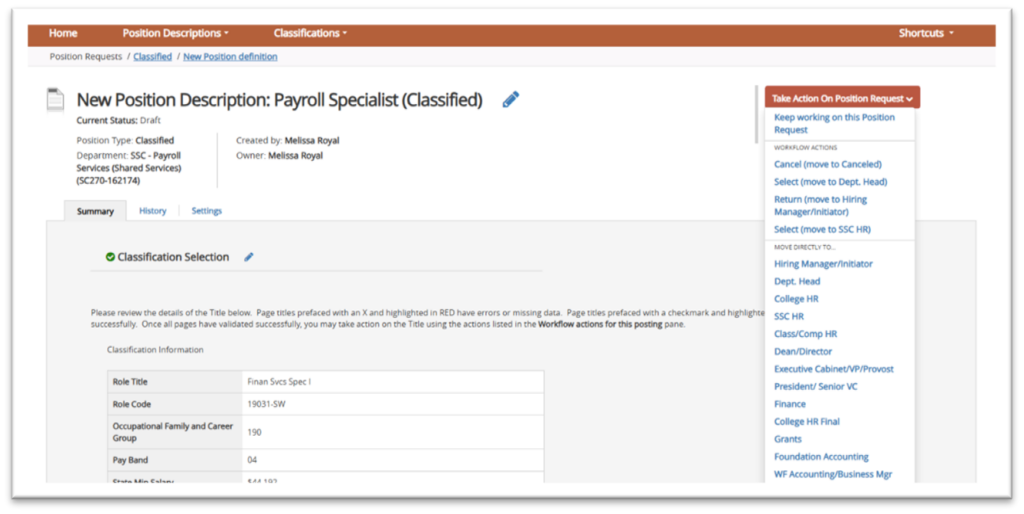
Note: In the example below, Position Justification shows an orange exclamation symbol indicating it is not complete. If you see this, click the Edit pencil and complete the section.

When creating a New Position, College HR will need to enter a placeholder in the Position Number field such as 298W9999. Once the position is transitioned to SSC HR to create that Position Number in HCM, the actual position number will become available, and SSC HR will then update the position number in PeopleAdmin and transition back into the workflow.
Moving Position Description Requests in the Workflow
To find a position request, click the Position Descriptions drop down to open its menu, and select the appropriate type Position Request(s).
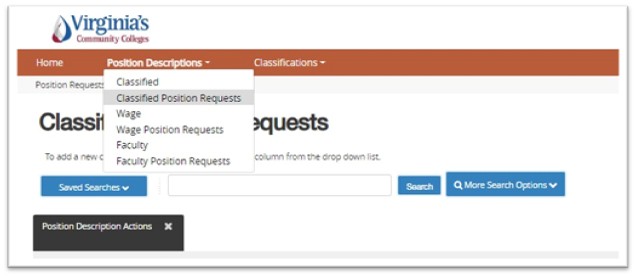
To move the position request along in the workflow, hover over the orange Take Action on Position Request button (upper right corner) and choose the action that you would like to take.
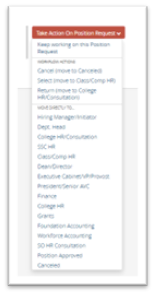

- Keep working on this Position Request - will keep position request saved where you leave off and allows you to pick it back up again.
- Workflow Actions – provides you the next step in the VCCS workflow state
- Move Directly to (only available for College HR users) - provides you additional steps to either go forward or send back to a previous workflow state
- When you transition the action, you will have the opportunity to choose a specific individual in the workflow and to add a comment. The comment will appear in the email sent to that specific individual and in the history of the position. If you cannot locate the appropriate individual, then choose your College HR who will route as needed.
To find actions again, hover over or click the Position Description menu item and select the Position Requests link it to see all position requests.
SECTION 3: APPLICANT TRACKING SYSTEM
Select the module from the drop-down menu (three dots) in the upper left hand corner and select Applicant Tracking System. The bar at the top of the page will turn BLUE.
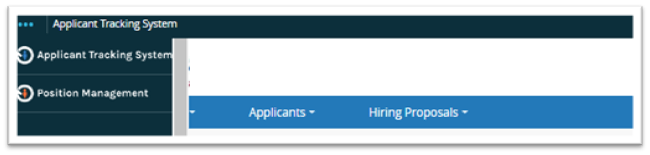
Postings
Select the Postings drop down and click position type. This takes you into the Postings list screen where you can create new postings for a position already approved or manage existing postings.

View/Edit existing Postings
Locate the position you wish to review. Hover over the Actions link on the row to the right associated with a specific posting and you will see the following options:
- View Posting: View selected posting
- View Applicants: View list of applicants who have applied to the selected posting
- Watch: Add selected posting to your Watch List for quick reference
Create a New Posting
Click the orange Create New Posting button (upper right corner). Choose how the posting will be added.
Note: Create from Position Type is only to be used for Adjunct or Workstudy.

Choices for creating postings:
Create from Position Type: ONLY for Adjunct or Workstudy
- Creates a posting with minimal information auto-filled
Create from Posting:
- Creates a posting by auto-filling information from an existing posting with which you can make any necessary changes.
Create from Position Description:
- Creates a posting by auto-filling information from an existing position. (Note: If you choose to create from a Position Description or Posting, you will be directed to the list Hover over the Actions link and choose Create From or View the listing and create posting from the summary screen).

Posting Process
Initial Page:
The initial settings page allows you to save a draft in the system so that you can locate and work on it later. Enter a Working Title on this page.
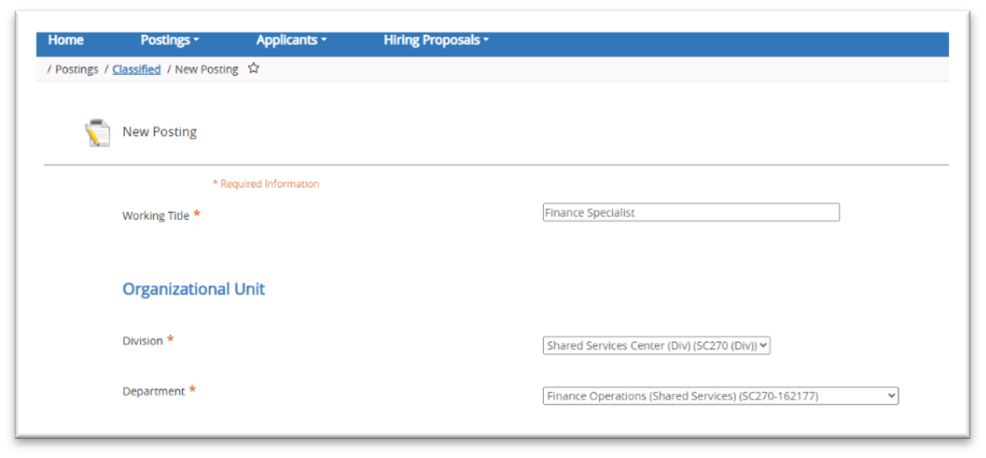
- Organizational Unit: Choose the College and Department where this posting will (Note: if you create from a previous posting or from position description this information will autofill).
- Job Alert: Choose the relevant category. This will ensure that applicants receive posting alerts if they have indicated they prefer to do so.
- Applicant Workflow: Choose the initial Workflow State an applicant will be sent to when applying to this This allows you to determine on a posting by posting basis if HR should initially screen applicants. If HR is not initially screening applicants, you will choose “Under Review by Committee” or “HM Review.”
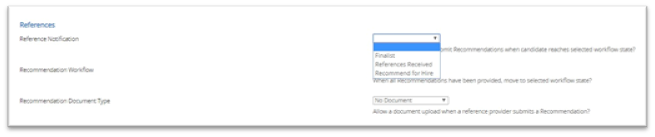
- References: If you want to use the reference form function, this field will auto generate a link to a reference form to send to the applicant’s reference providers at the selected workflow state. Under Reference Notifications, select the workflow state where you want to request the references. You may choose to obtain references at the finalist stage or when recommending for hire (do not select References Received as that is not applicable here.) The best practice for Recommended Workflow is “References Received”. Document Type will be “No Document” for the VCCS electronic reference form. If the college wants to call references leave these fields blank.
- Accept online applications is defaulted so all applicants are able to submit an online application.
- Supporting Documents. Check this box if you would like to allow College HR to upload supporting documents to the application.
- Posting Documents. If documents were previously associated with the position description, you can select them to be included with the posting.
- Click the orange Create New Posting button in the upper right corner or lower right corner.

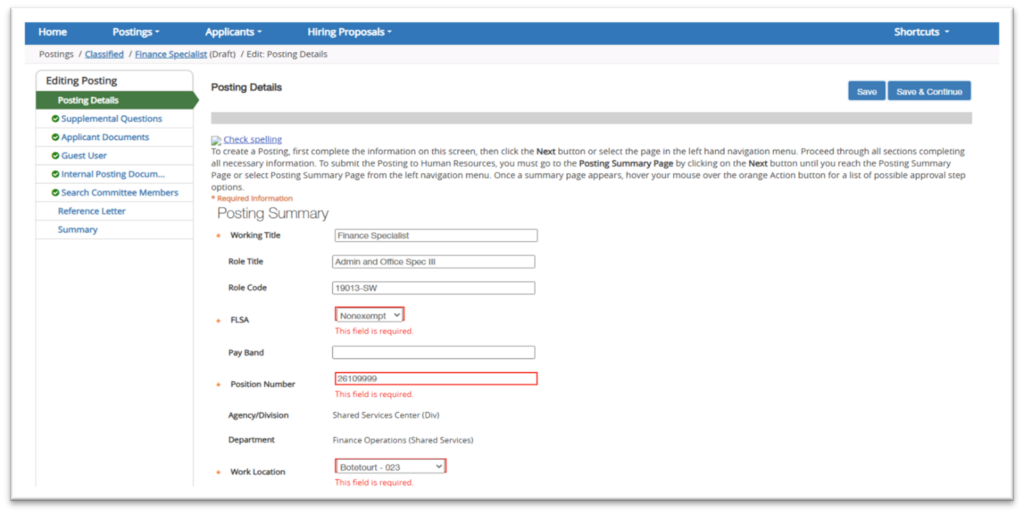
Posting Details:
Fill out the fields. Any field outlined in red and/or marked with a *red asterisk is a required field. Click Save & Continue.
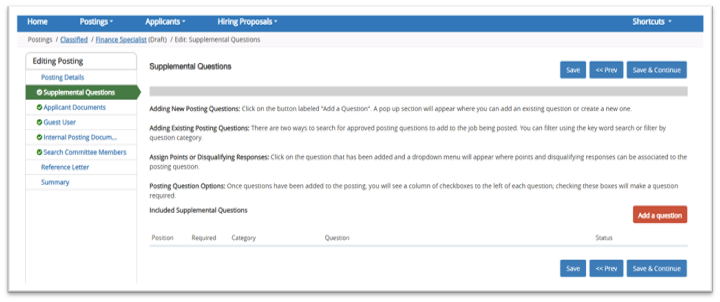
Supplemental Questions:
This allows you to add more questions that you would like the applicant to answer when applying for this position. To add a question, click the orange Add a Question button on the middle right side of the screen and a box will appear. You can either choose from questions that populate from previous postings by clicking the Add check box or add a new question by clicking the Add a new one link. To add a new question, provide a name and the question.
- Open Ended Answers:
Will appear as a text box.
- Predefined Answers:
You can predefine answers for the applicant to choose. More boxes will appear as you tab.
Once you add the question to the posting, you can click on the actual question link and specify if you want an answer choice to be disqualifying. If candidate answers and does not meet qualifications, they will receive an email upon completion of application that they did not meet the minimum requirements for the posting.
Applicant documents:
Here you can choose which documents for the applicant to include. To have the document optional, click Optional. To require the document, you must click Required.

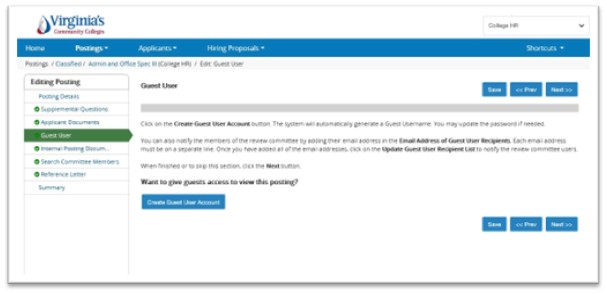
Guest user:
Guest users are for others outside of VCCS that may partake in the interview process. In this tab you can create a new guest user. This will create a generic user name and password that you can give guests to enable view only access to the posting. Enter an email address for each guest and a notification containing the guest user login credentials will be emailed to those users.
Internal Posting Documents:
This allows users to attach additional documents to the posting for consideration during the approval process. These documents are configurable and you will be able to choose what documents you would like to attach on postings.

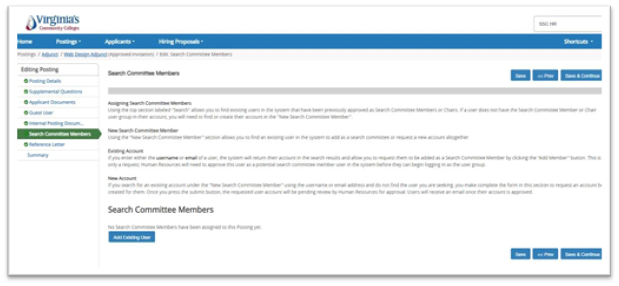
Search Committee:
You can assign members to the search committee on this page. You can search for existing search committee members using the search at the top. All employees should already have a PeopleAdmin account, but not all will have search committee user access. If an employee does not populate it means that they do not have the Search Committee user group attached to their profile. Uncheck ‘Display search committee user group members only’ to show all users. If you need to add someone who does not have a Search Committee user group, you can still add them, and they will show pending until approved by College HR.
Reference Letters:
This section is where you can specify the reference requirements. This section is here even if you do not choose to accept reference forms in the settings page. You will need to identify how you wish to obtain reference checks so that SSC HR can monitor any delays.

Summary page:
On the summary page you can review the posting, see how the posting looks to applicants and see a print preview of both the internal and applicant view of the posting. HR can also activate a guest user on this page. You can also move the posting in the workflow for its approvals, as necessary.
Workflow:
To move the posting along in the workflow, hover over the orange Take Action on Posting button in the upper right and choose the action that you would like to take.
When you transition the posting, you will have the opportunity to add a comment, which will appear in both the email that the state owner receives and in the history of the posting. You can also flag it to appear on your watch list, and this will display the posting in the Watch List on your home screen.

SECTION 4: REVIEW APPLICANTS
You can review applicants by posting, or you can locate specific applicants without locating the postings to which they have applied.
Applicant Review by Posting
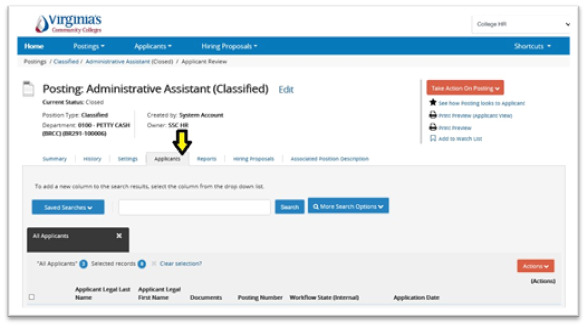
Navigate to the posting where you wish to review applicants. To do this: Select the Postings drop-down.
- Select the position The postings search screen will populate.
- Search for the posting you wish to view.
- Use the orange Action drop-down on the right of the row, to choose view posting or view applicants.

- View applicants will direct you to all applicants for that If you choose view posting, click the Applicants tab in the posting to see a list of applicants that have applied.
Workflow:
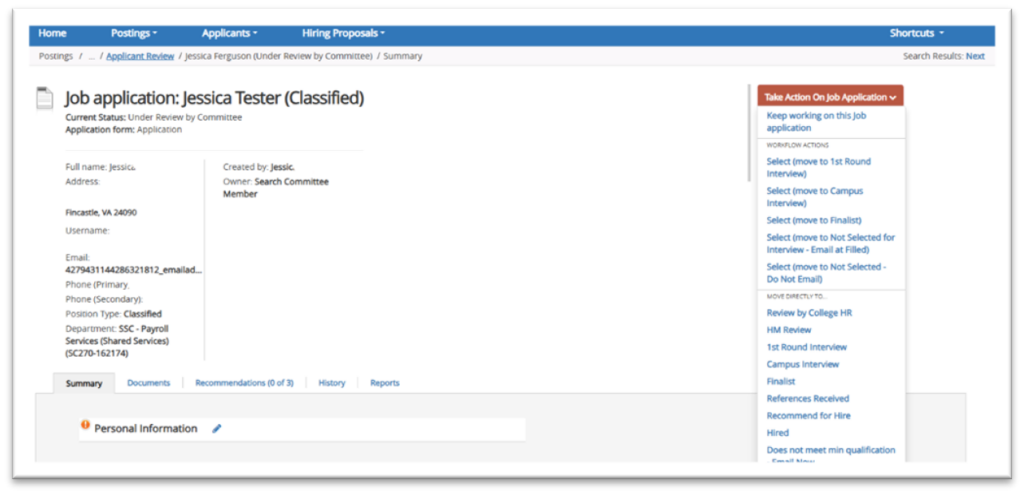
To move the applicant along in the workflow, after selecting the applicant, hover over the orange Take Action on Job Application button (upper right corner) and choose the action that you would like to take.
You will also be able to return to the previous owner or skip ahead in the process in some instances, if specified in workflow.
Applicant Review by Applicant Search
Select the Applicants drop down and search applicants by clicking Applicant Search. The applicant search allows you to see all applicant accounts in the system. When viewing an individual applicant, you will be able to see all postings that applicant has applied to.

Alternatively, you may also perform a search of applications by clicking the Applications for the position type you want to search within. This will take you into the list view for each option.
Note: These searches are typically only available to College HR or Administrative users. These are global cross posting searches. Each departmental user will typically only see applicants on the postings they have access to.
Application Search
General Actions:
After selecting the position type, hover over the orange Actions button (upper right of search area) where you have the following:
- Export Results: Export the current list view into an Excel document
- Move in Workflow: Move all selected applicants to a specific workflow state
- Email Applicants: Send a bulk email out to selected applicants
- Download applications as PDF
View Applications: Hover over the Actions link next to a specific application and click the View option.
View/Edit existing Applicant:
Hover over the Actions link and click one of the following options:
- View Applicant: View selected applicant (You can also view the applicant by clicking on the blue Last Name link in the left column)
- Edit Applicant: Edit the Login and Contact Information for the applicant.
SECTION 5: HIRING PROPOSAL
When an applicant is selected, the next step is the hiring proposal.
Creating a Hiring Proposal
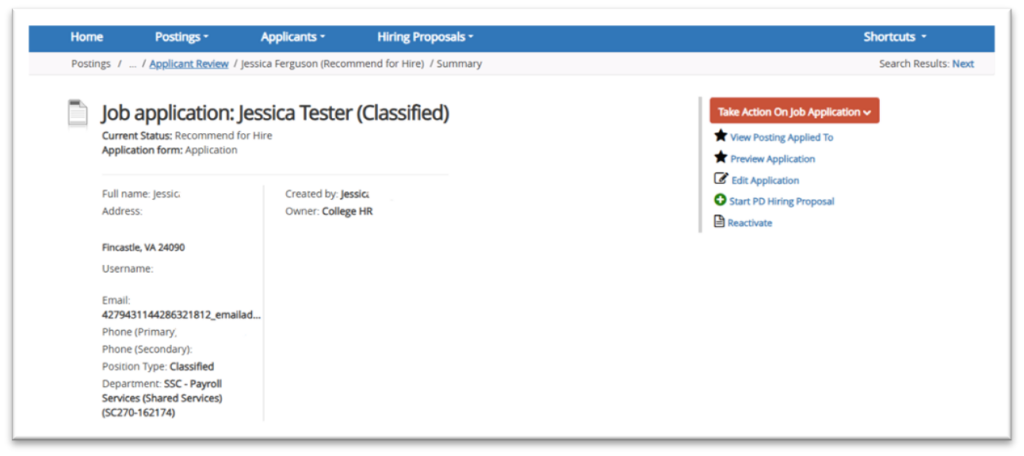
Once the applicant is moved to the appropriate state (Recommend for Hire), users with the College HR or Hiring Manager roles will be able to start a hiring proposal. A link will appear in the upper right-hand side of the summary screen for that application to Start PD Hiring Proposal. A green plus will be beside the link.
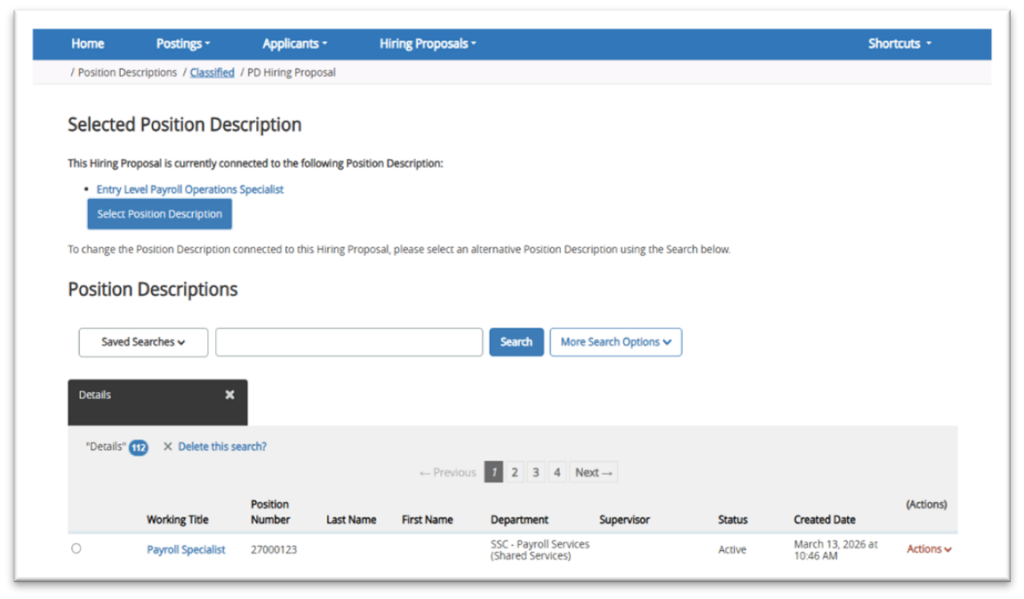
Once you click the link, the system will take you to a search page for position descriptions. If your posting was created from a position description, the name will appear near the top of the page under “Selected Position Description”. If you want to hire into a different position description or if your posting was not created from a position description you can search and choose the position description to hire into. Click the Select Position Description button to start the hiring proposal.
Note: If a Hiring Proposal already exists for this position number you will receive the following warning:
This Position Description already has a Hiring Proposal in process.
Hiring Proposal:
Fill out the necessary fields. All applicant and position information should auto-fill. Click Save & Continue.
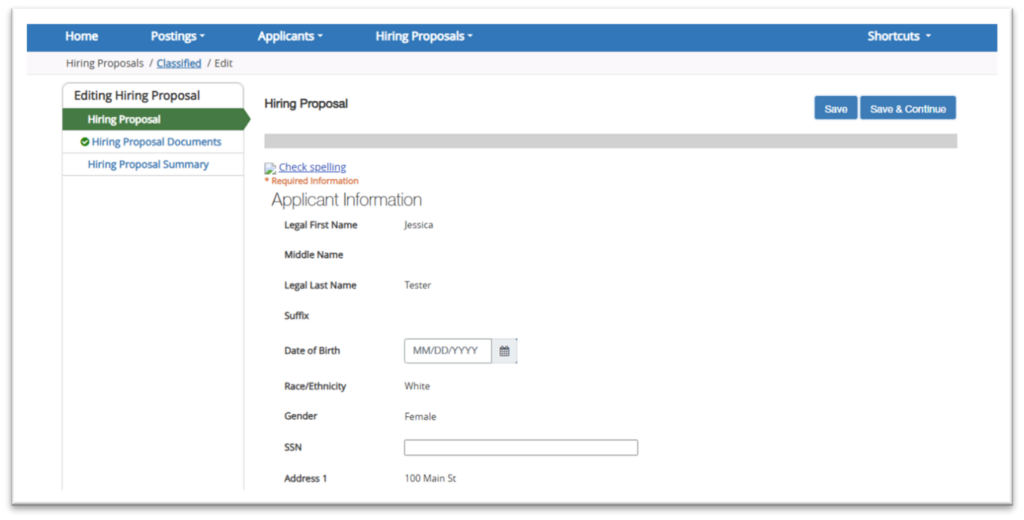
Hiring Proposal Documents:
Attach documents to the hiring proposal if needed for approval.

Hiring Proposal Summary:
On the summary page you can review the hiring proposal and see a print preview of the hiring proposal.

You can then move the hiring proposal through the workflow until it is approved.
Workflow:
To move the hiring proposal along in the workflow, hover over the orange Take Action on Hiring Proposal (upper right corner) button and choose the action that you would like to take.
When you transition the hiring proposal, you will have the opportunity to add a comment, which will appear in both the email that the state owner receives and in the history of the hiring proposal. You can flag it to appear on the watch list. This will display the hiring proposal in the Watch List (home screen).
Once the HP is moved to ‘Hire Approved’ SSC HR will move the HP to the ‘Avature’ workflow which will integrate into the onboarding system. SSC HR will then move the HP to ‘Hire Finalized’ and the employee will be seated into the position.
Final steps:
Once the hiring proposal is finalized, the applicant is moved into the Hired status. College HR must then go back into the posting and mark it as Filled. This will generate “position has been filled” emails to all other candidates.
Search and Manage Hiring Proposals
Select the Hiring Proposals drop down and click the position option. This takes you into the Hiring Proposals list screen for the selected position type where you can manage existing hiring proposals.
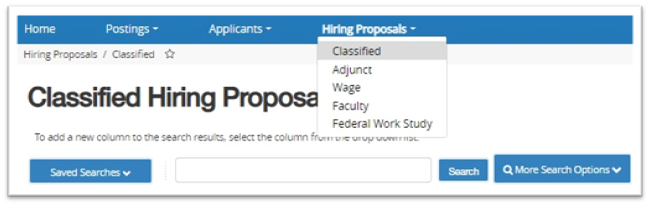
Hover over the orange Actions button where you have the following options:
General Actions:
- Export Results: Export the current list view into an Excel document
- Move in Workflow: Move all selected hiring proposals in BULK to a specific workflow stage

View/Edit existing Hiring Proposals:
Hover over the Actions link next to a specific applicant and click one of the following options:
- View: View selected hiring proposal (can also click the blue link in the left column of the list)
- Edit: Edit selected hiring proposal (only if it is NOT in a final/approved workflow state)

